Working Examples
Well, Microsoft finally declared XNA officially dead. Needless to say, I was not too happy about that. The worst of it is that the XNA community will be dying out and there just really is no future for XNA. It's a real shame because it is by far the best environment to learn 3D Programming in.
Anyway, I probably won't be working on XNA tutorials in the future as I don't see a whole lot of point in spending huge amounts of time on stuff almost no one is going to use. I do intend to start doing tutorials on 3D programming in some other environment. I'm just having an extremely difficult time figuring out what to replace XNA with, since there really is no replacement.
Since I probably won't be finishing my tutorial series, I wanted to give you a chance to get a copy of some of my working examples that I put together to prototype for future tutorials that will now almost certainly never get written.
These are not tutorials. They are just working programs and as such there won't be much support or help with them. But the all do work. So, they should be good to download, unzip, install as your own XNA 4.0 project, and just run it. You can see what's possible, but more importantly, you can then go through my code and figure out how I did it.
These were all compressed with 7Zip, but should decompress with PK Zip. I run anti-virus on my computer, but you should always scan anything you download from an unknown source.
Example Programs
Tiles and Quaternion Example
In this first example, I had originally wanted to do a modular indoor level editor type program. I was getting a lot of inspiration from the Never Winters Nights video game. The idea was that a 3 by 3 area of tiles would be a "room module" and that you could select many different room modules to place in any area. You could also rotate that room module in any of the 4 cardinal directions. By placing the room modules into the scene you could build an interior, such as the insides of a house, the insides of an office, the insides of a dungeon, or theoretically any indoor environment.
In this example, I had only gotten as far as placing floor tiles when I got in a discussion with someone on how to do quaternions. Since I was working on this program, I put in a box and wrote code to control it with quaternions. So, it's actually a really good example of how to control an object with quaternions in addition to being a tile program. This is also the foundation for my interiors program I'll post after this. So I recommend going through this first.
Both the camera and the box are controlled by the keyboard. I think the box is mostly on the number pad whereas the camera is on wasf.
Quaternion Tile Example (1.4MB)
Interiors Example
As I mention above, I was working on a NWN's style level editor for interiors. I actually made pretty good progress. The room modules are very simple models that I made in Blender. You could easily make more artistic or realistic room models.
I forget exactly how I did the collision system, but it was based on the room module that was being used in each area. So, the collision system knows that either there is no wall, there's a solid wall, or there's a wall with a doorway. And it does ray casting to determine whether the avatar can pass through or not.
I was in the process of trying to put in place-able doors when i quit. You can walk right through the one door that has been placed.
The G button turns the tile grid on and off. The P button displays text that shows you the exact position of the avatar. I believe the difference in position between absolute and grid is that the grid is shifted in 3D space so that the center of the grid is at 0,0,0. So there's an offset that's half the size of the grid. Area tells you which 3 by 3 area you are standing in. Type tells you which room module is in that area. And Rotations tells you how the room module is rotated in that area. Arrow keys and Pg Up/Dwn control the camera/avatar.
Interior Level Editor Example (6MB)
Multiple Point Lights
This next example was one of the very last things I worked on in XNA. I was trying to figure out how to do an unlimited number of point lights in a scene. The default lighting in XNA works pretty well for outdoors. But once you come indoors you have to start doing more realistic lighting.
I was trying to figure out how to be able to place multiple light sources to light up any scene. Needless to say, this requires High Level Shader Language. So, I was trying to figure out how to do it in HLSL and it's not easy. This is certainly an advanced XNA example. But it might be useful if you are trying to figure out how to solve this yourself using other examples.
One of the problems I ran into is that the technique uses HLSL to draw the screen 3 times even before it draws anything on the screen. It was very difficult for me to understand the process when I could not actually see what was drawn on the 3 invisible images used to compose the final image.
So, I figured out how to divide the screen into four images and draw all 4 images on the screen at once. The image in the bottom left corner is the only one you would normally draw on the screen. The other three are not displayed normally, but used to compose the final image.
The top left image probably looks like a blank white field. It's not. Get up close to the car. When you get really close you can see the car. If I recall correctly, it's a depth image that stores how far each pixel is away from the camera. It's not in your standard RGB color format, which is why it's blue and white. The format used is supposed to be more efficient for this.
I can't remember what the top right and bottom right are. One of them is the normals for every pixel in the scene to show what direction that pixel is facing in doing the lighting calculations. That must be the upper right one.
The lower right image is partially processed. You can see that the light has been applied because you can see the darkness outside of the illuminated area. This must be some sort of shadow map to show where shadows fall. Honestly, I can't remember right now what it is.
Basically the way the technique works is that it uses an invisible spherical primitive to define the area illuminated. That's the PPModel.fx file I believe. That sphere is never drawn, but it's used in the illumination calculations.
Notice that these lights cast no shadows. THAT was what I was worried about working on next but never got to it.
Multiple Point Light Source Example (1MB)
Terrain Example
Also, I wanted to share my terrain example with you. This is the terrain program shown on the home page. I intended to make it a tutorial but never got around to it. The file is huge but it's a very good example to study on terrains. It does a whole lot of stuff most tutorials don't.
First of all, it uses a skybox from my content page. Second, it is a textured terrain that has it's height determined by the Heightmap.bmp file. I believe the lighter the pixel the higher that point is in the greyscale image.
It has randomly placed trees that use a alpha channel for transparency. This is one trick used for doing game objects like trees. You place two images in a cross with one another. I've seen trees done this way before but even the high end games like Skyrim use this technique for tree branches with a full model for the trunk of the tree. Weeds in top named games also use this technique a lot. But it's a simple way to do trees. The alpha is tricky because you are often looking through several layers of alpha transparency at the same time.
One of the biggest things about this example is that it actually does terrain collision. The avatar "walks" over the terrain rather then gliding over or through it like in many terrain examples. There's also an invisible wall at the edges of the terrain.
And there is a sound played for foot steps as well as ambient background noise. The background noise file is what makes this download so ridiculously huge. I would have liked to have made it smaller but it is what it is. Sound files often don't compress very well with non-audio compression.
Note that this is all lit with standard built in XNA lighting. The built in lighting does a pretty good job for exterior stuff because it simulates the sun pretty well.
Terrain Example (194MB)
Water Example
This latest example is focused on creating "water". It's in many ways an extension of the "Terrain Example" above. In fact, it uses the same skybox, terrain, and a lot of the same code for those things. The big difference is that I dropped the audio and trees and instead put in an "ocean". I also took out terrain collision as that would have had you walking on the ocean bottom. Instead I just kept the camera at "sea level" (Y =0).
Before I quit XNA, possibly permanently, I wanted to learn how to make oceans and lakes. In this example, I have 3 projects in the solution. The first project just creates a mirrored plane, as one of the main aspects of the water is for it to be reflective. I wanted to start out by keeping it easy and just make a quad(two triangles) with a mirrored surface.
Throughout this whole thing, I wanted to use HLSL as little as possible. When you're trying to learn, a bunch of un-needed complexity just makes it harder to understand. You don't need to know how to do Blinn and Phong shading in order to put a mirror shader to work, or really even to understand how a mirror shader works. Now of course, there is no mirror or water shader built into XNA. So, if you want those effects, you have to build them in HLSL. But as much as possible, I wanted to do everything else without using HLSL. If nothing else, it proves that you can mix and match, using Basic Effect for many things, but throw in a custom HLSL shader when its required.
The technique on mirroring is basically to move the camera to the upside down opposite position (flip the Y coordinate assuming the "ground" is at zero and that the mirrored surface faces upwards). You then draw the scene as normal, from this perspective, on to a hidden drawing surface (place in memory). Then you can draw the whole scene normally and add a "mirrored" surface, by "texturing" the surface from the stored image you created. It's really pretty straight forward.
But just running the program you won't really see that it's a mirrored surface until you walk off the edge and see what's below the mirrored surface.
The second project adds "waves" to the surface to make it appear liquid, although it's 100% reflective like an ocean of mercury. I think I may have left out part of the reflection calculation in that version, because I seem to recall fixing that in the third project. But it basically uses an animated bumpmap to simulate ripples in water. By mathematically moving the bumpmap, it animates the ripples to move. I've heard you get an even better effect when you combine two separate bumpmaps. In this project, I also switched out the skybox texture, in the skybox model code, to a night time texture. I commented it out, so you can just swap it with the other texture in the skybox file. This allows you to see that this actually is a mirror of whatever is put above it to reflect. (One technique I've see for water uses cube mapping to reflect the sky in the water, but doesn't reflect anything else in the scene.)
And then finally, I wrap it up in the third project (which is set as the default). In the third project, I add the terrain from my "Terrain Example" above to both give something for the water to reflect and to make a more complete scene. I also, make the water refractive and semi-transparent as well as giving the water a color tint. Now that I think about it, maybe it was just the refraction calculation that I added and not something missing in the earlier project.
If you wanted to add some terrain collision you could put the terrain collision code from the "Terrain Example" back in pretty easily. Then you could walk on the terrain. You might then say if the altitude is below zero ("sea-level") to force it to remain zero in order to "walk on water". You could then add code to say that if the altitude below the "boat" is above zero ("sea-level") you cannot move into that quad (grid square). That would keep "boats" from being amphibious.
I'm considering doing just that. One of the reasons I wanted to do this in the first place is that I've been interested in boat simulators. As a next step, I'm considering starting a brand new XNA Solution and doing boat simulators. I've got a couple books I'll be using to understand the physics simulation and I've been thinking about trying to model boats in Blender. I would need to get a whole lot better at Blender to be able to make a respectable boat. On the other hand, it seems like you just can't find good models out there, especially for free. I've looked quite a bit including looking for a boat model last weekend. I found one that was probably very high poly and tried to import it to a .X file from the Sketchup Warehouse, but it didn't export correctly and was useless. I also tried exporting it to Blender and that didn't work either. So, I guess I'm just going to have to learn to model my own boats.
Anyway, this is a decent example of how to do water. It has a bug or two in it that you may see. Some of that I think has to do with the fact that I did not use clip planes. I got a lot of my ideas from Riemer's examples. However, his water example is for XNA 3.0 and they removed clip planes from XNA 4.0 which makes his examples not even functional in 4.0. I did find a discussion from Shawn Hargraves on the Internet where he shows how to do clip planes in HLSL. I need to go through that at some point to learn how to do it.
But the bottom line is that this is a functional example to get you started. Maybe if you take time to study it, you will be able to figure out where the bugs are at. Meanwhile, it allows you to play around with adding water to your programs. And since I wasn't able to find a working example of 4.0 code on doing water, this may be one of your only working examples.
If you want to allow swimming or other underwater travel, you may have to change the shader to reflect downwards as well as upwards. I haven't tried it. You also probably want to add code that says that if the camera is below zero altitude ("sea-level") that you are "underwater" and that means turning up the fog effect to a thick green (fresh water) or blue (salt water) fog (as a scuba diver I can tell you that 10 feet visibility in a lake is good visibility whereas far offshore ocean water can get to maybe a couple hundred feet of visibility - it's still a lot less then air even in the clearest water). Or if you're really getting into HLSL, you could have the code use an entirely different shader for underwater that does blur and refraction, but that would be way beyond what we're doing here.
Ocean Example (83.4 MB)
Path Finder Example
This next example is in 2D. Although, the principle it shows could apply to 3D as well.
Someone asked me how to do a closed loop track with Bezier curves. I created and example of a track defined by a few points and the Bezier curves defining the curve points in between those points to form a track. And I created a little "space ship" icon to follow the curve.
Someone else asked me how to modify it to make multiple ships. Although, I had not originally designed it for that, I made the ship into a class and instantiated a few instances of the class for this example.
Pathfinder Example (83.7 KB)
Gimbal Lock
Exposing the myth of gimbal lock. This example demonstrates that gimbal lock is a problem with misusing Pitch, Yaw, and Roll rather than a problem with matrices. It also proves that gimbal lock can be achieved with Quaternions. Quaternions supposedly exist for the sole purpose of preventing gimbal lock, but this program demonstrats how to achieve gimbal lock with quaternions as well as how to avoid gimbal lock using either matrices or quaternions with no preference between the two.
Gimbal Lock Example (88.9 KB)
Summary
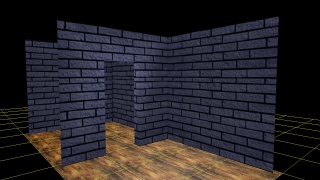
Above is a picture of the interior level editor I'm working on as a prototype for the next tutorial.
The link has the project files for the prototype I'm building for the next tutorial. They are in a Zip file made with 7-zip (if that matters). All files are included.