Matrices In Motion - Part I
I want to start by covering Blender a bit. When I originally started working on this, I quickly realized that I needed some models to work with. There are sites on the Internet where you can download free models, but once you start doing it, you will quickly start realizing that there are very few models out there that are worth downloading. Most of them will not be in the .X or .FBX file formats that XNA supports. At the very least you'll have to convert them to these file types and that can be a nightmare if you don't know what you're doing.
There are some truly great models out there, but it turns out that artists like to eat and get paid to buy groceries. Making a model can be extremely time consuming. It gets faster the better you get, but a great model is still a tremendous amount of work and years of practice. So, the really good models are so expensive that you're probably better off just hiring a crew of artists on retainer. You do have $100,000 to pay their first year's salary, right? No. Well, maybe you can afford to just pay them their $150+ per model?... Neither can I and I make pretty good money.
So, what that means is you better "cowboy up" and learn to be an artist. I believe you have a lot more artistic talent than you realize. I think anyone can become an artist if they're willing to spend a few 10s of thousands of hours at it. That's the primary difference between an artist and a non-artist, about 10,000 hours. Granted, that may seem overwhelming, but you don't have to reach that level to produce art for your game. And once you get into it, you may find out you like the art more than the programming.
If you want to get fairly good at art stuff, take tutorials on the Internet. Maybe take some classes, and above all else just get in there and start doing it. Doing it is where you'll accumulate about 9,000 of those 10,000 hours. But it's really the 1,000 hours of focused training that will make those 9,000 truly productive.
Who can skip this?
You can mostly just move on to Part Two of this tutorial if you're a Blender guru, or really even if you know Max, Maya, or one of the other packages. I'm mostly just going to introduce Blender and basic modeling here.
Voila! You're an artist!
One of the principles of this web site and its philosophy is "only use free tools". I assume you're on a shoe string budget, and I don't want to let the price of some piece of software keep you from doing this. So, I'm using 100% freeware/shareware type tools.
I actually took a training course on using 3D Studio Max that was excellent, and I've worked with Max on and off for many years. The problem with Max is that a full copy was about $2,000. The student version is much more reasonably priced if you can get that. I think it's around $100, but you have to prove that you are a student. The other big package all the pros use is Maya. Maya costs around $5,000 and both pieces of software are now owned by AutoDesk. I believe that if you buy all the extras for Max that bring it up to the same level as Maya that Max also ends up costing about $5,000. That's great if you're a big budget studio. But when you're one guy just trying to do things on your own its ridiculous to think you're going to pay $5,000 for a piece of software that you're not even sure you'll ever figure out how to use, and may only use a couple times and then never again.
That's where Blender comes in. I love Blender. Blender does everything that you would want to do in Max or Maya. Granted, after you've put your 10,000 hours in and are a "true artist", you may want some of the features that Max and Maya offer that help professionals. By that time you'll probably be charging people $150+ to make models for them. Until you reach that level, Blender is likely to do everything you can handle. I've yet to find something that I need it to do that it can't and it constantly surprises me with things I suddenly learn that it can do.
And the best part is the price tag... Free. That's right. Blender is free. It started out like Max and Maya and the makers of the software basically abandoned it and turned it over to the open source community. And the open source community has been running with it every since.
So, it doesn't cost anything to download the latest version of Blender and try your hand at being a modeler.
As a game programmer, even if you plan on having another professional modeler come in and do models for you, it's awfully handy to be able to throw together a crude model real quick. You can always have modelers who are better than you are come in later replace all the models in your game with their professional models.
If you get a game working with crude models, you are going to have a much easier time convincing great artists to join your project and contribute their great models. A professional modeler who gets to play a fun game with crude models is going to think, "Wow! I want to be part of this project! The models stink, but that's what I do! I can fix that part. And other than that, this is an awesome game!"
Not to mention that a game with crude models may have a certain charm to it.
And you're going to get better at this the more time you spend at it. So, let's dig in and learn to do some crude modeling.
Getting Started with Blender
I'm currently using Blender 2.63 and 2.68. I'm not sure there is much significant difference between the two, but the Blender team is constantly coming out with new version and sometimes the changes are significant. You can download the latest version here.
There are Blender tutorials all over the Internet. Just google "Blender Tutorial". You should even find some on YouTube. So, I'm going to kind of gloss through this and cover specifics to get you started.
First, Blender tends to startup with a cube in the scene. Likely you don't need that cube. If you right click on it and select it you can delete it. It will bring up a small pop-up menu that asks if you really want to delete it.
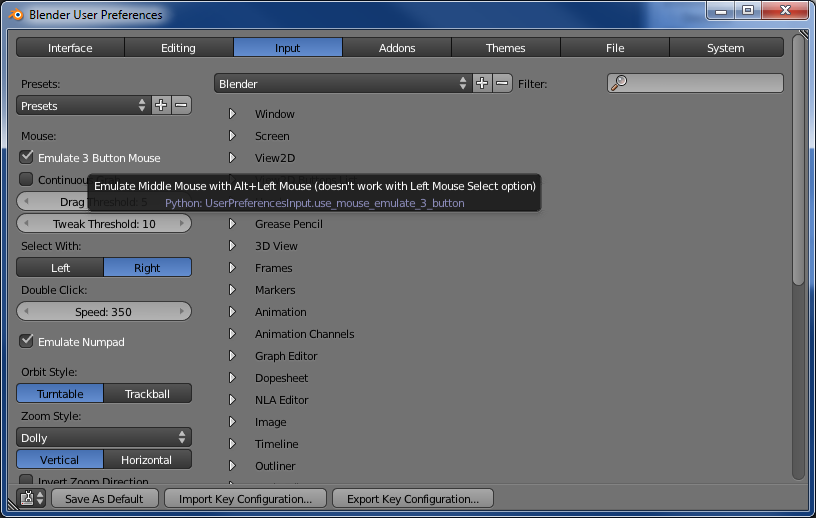
Now one thing that I really hate about Blender is that it likes to use the mouse wheel on the 3 button mouse that I don't have for fundamental stuff, making it absolutely necessary. To the makers of Blender: I don't HAVE a 3 button mouse and I can't USE one with my computer even if I had 100 of them! Not all computers have a mouse and eventually none of them will have one. Fortunately, Blender is very flexible and configurable. So, the first thing I do when I start up Blender is fix the messed up mouse problem.
If you don't have a 3 button mouse, you need to do this: Go to the File==>User Preferences menu. On the Input tab you have an Emulate 3 Button Mouse check box. Check that box. Now when you hold down the Alt key it will act like you have a mouse wheel and you can get some actual work done.
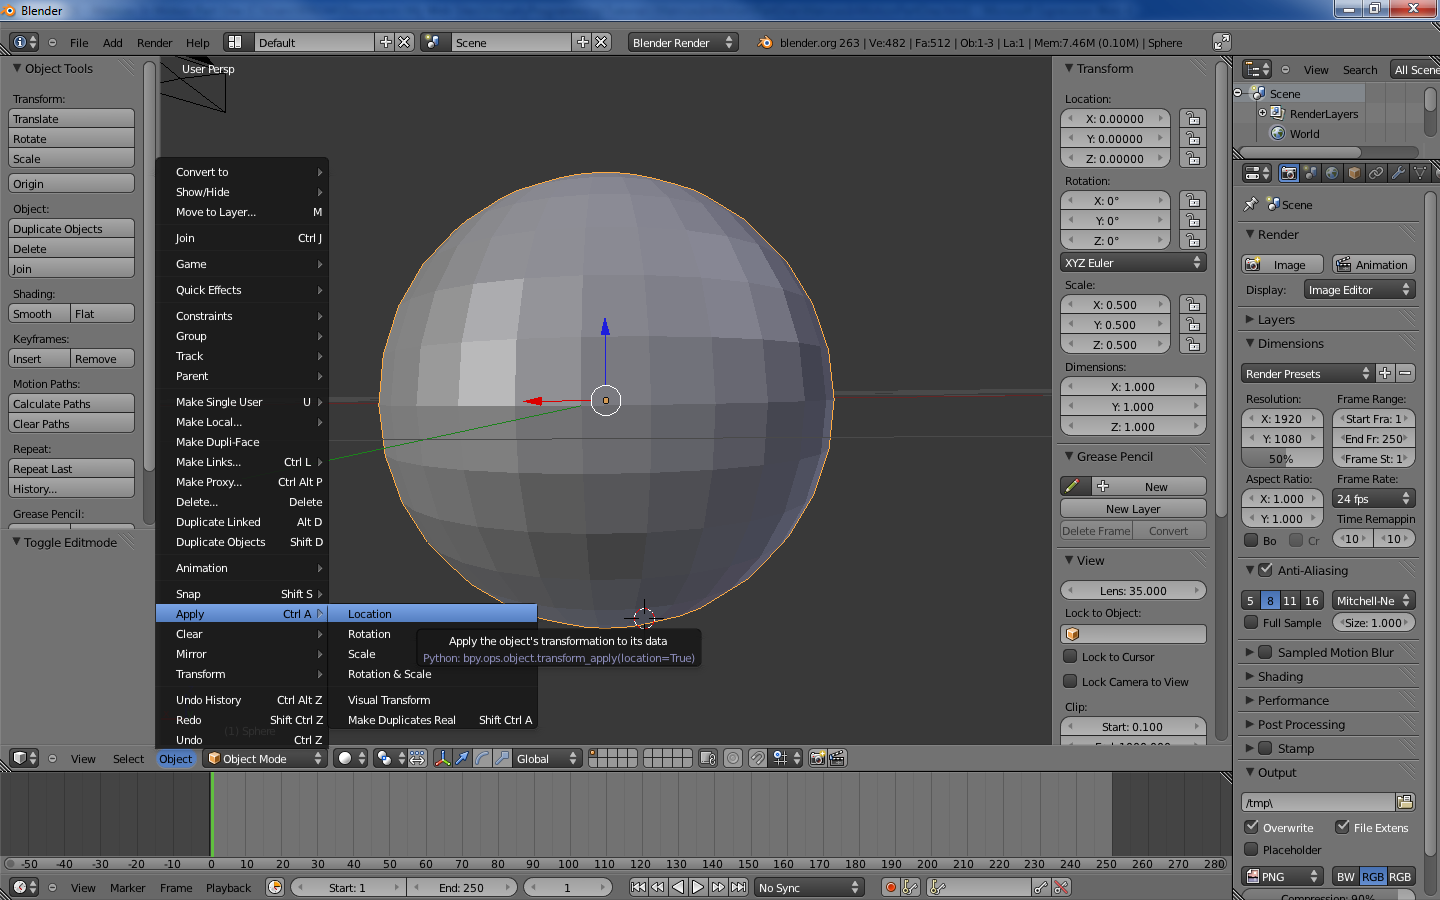
Now that we've gotten that ugliness out of the way, let's get down to business. Click on the menu at the top on Add==>Mesh==>UV Sphere. This is going to create a sphere model, much like the one used in this example called "blue sphere".

Now Blender will create a default sphere, but you generally want to be extremely precise when modeling. For one thing, the center of this 3D scene in Blender will be the center of your model. So, at the very least you want to get your model centered properly. You also may want to resize it.
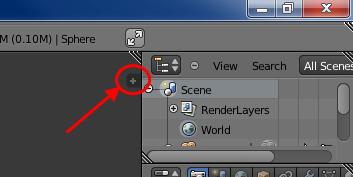
In the main viewing panel you will see a little plus sign. If you click on it you will get another menu where you control the initial setup of the sphere. Under "Transform" you have X,Y, and Z values for "Location". Click there and set each of the 3 to zero. That will center our newly created mesh at the 0,0,0 location in this 3D scene and make the center of the model be that point.
Under "Dimensions", set the X, Y, and Z values equal to 1. This will resize it to be half the original size and also make it the size of "blue sphere" in this example.

Next, hold down Alt + Ctrl and click and drag the mouse downwards. This should zoom in if you have 3 Button Mouse mode selected, like mentioned earlier.
Now we want to paint our model to give it some color. This is going to be basically what they had in the early days of 3D graphics: colored triangles. Eventually, they started using a technique called texturing which we explored a little in the first tutorial. For this tutorial, we are not going to use textures to demonstrate this method of painting, and to keep things simple for now. Most of the models you will create will involve UV wrapping and textures, but for now we'll simply assign color to our model's vertices.
Down towards the bottom of the screen, you should see "Object Mode". You want to change that to "Vertex Paint".
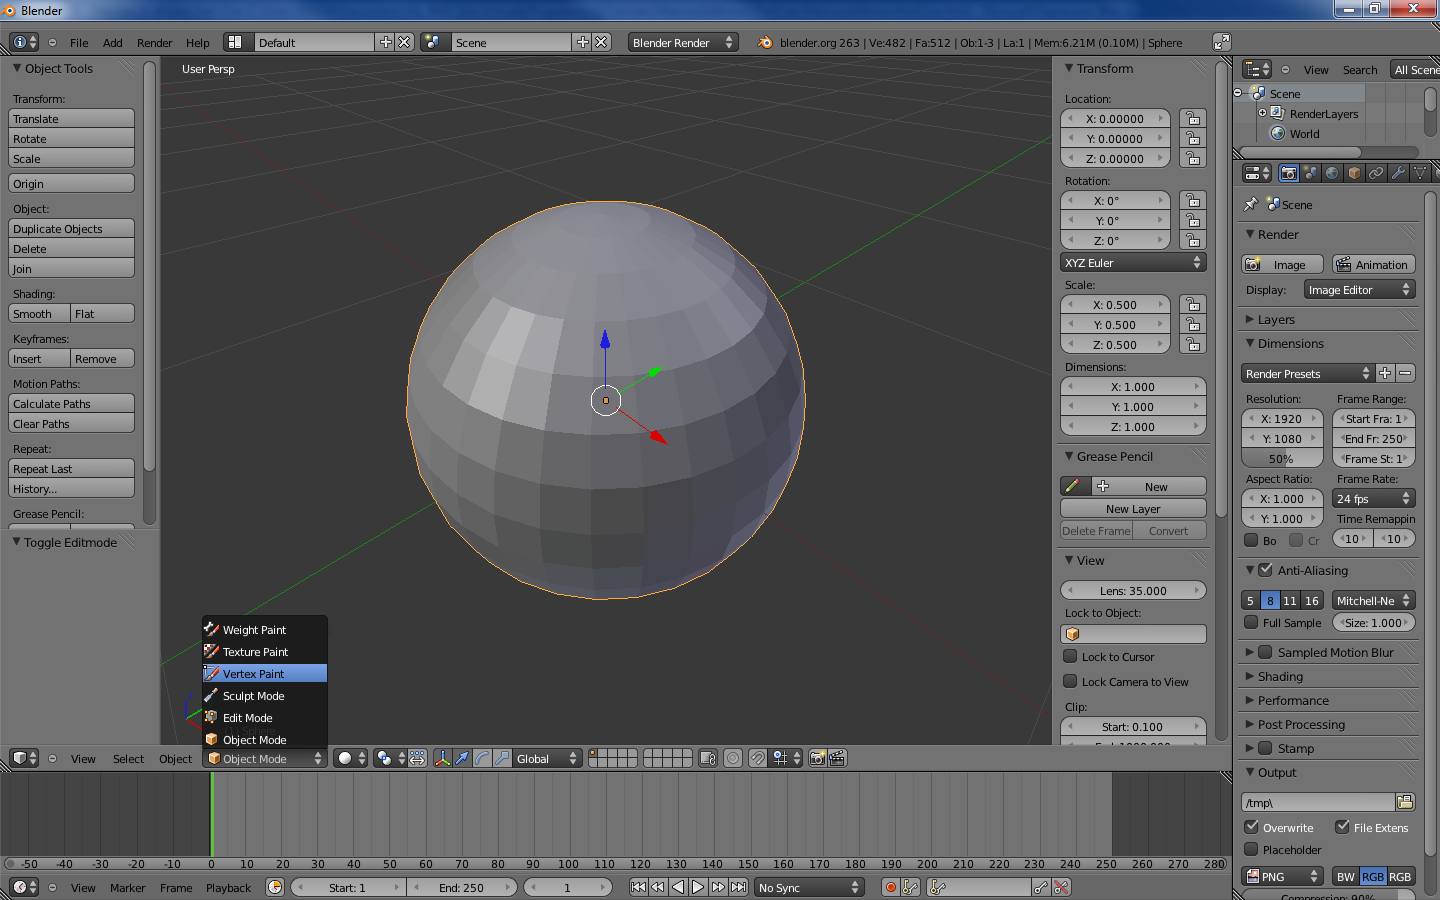
This will allow you to assign colors to a selected vertex. Initially, it is completely white. There is a color wheel on the left hand side where you can select the color and size of your brush. For "blue sphere" I set the brush to blue and increased the brush size to assign everything the same color easily at the same time.
If you hold down the Alt key and left click you can turn around the model in order to paint all sides. Alt + Ctrl will allow you to zoom.
After you work in XNA for awhile, you will learn that a vertex can be assigned not only a position, but a color as well. This method will allow you to assign those colors to a model, one vertex at a time or to color all of the vertices the same. Either way, color is attached to each vertex. It's important to think of vertices as not only positions, but additional information like colors as being part of the vertex as well.
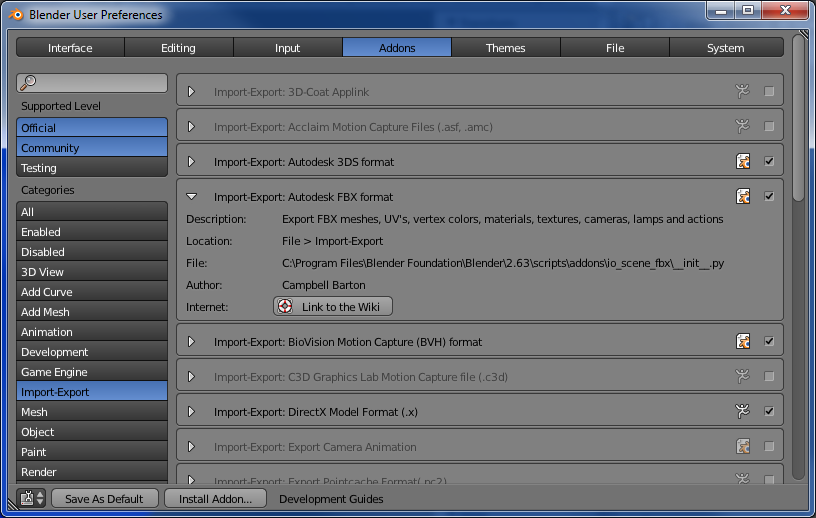
Once you have your model painted, you're ready to export it. But you need to make sure that Blender is setup to export the file type that you need. It's been a long time since I set my copy up. So, I don't remember if .FBX is there by default. You can check it by going to the File menu and on the AddOns tab of the User Preferences under Categories, click on Import-Export Autodesk FBX Format and make sure it is there and selected. File==>User Preferences==>Addons==>Import-Export==>Import-Export: Autodesk FBX format. Make sure that the checkbox in the upper right corner is checked.
Go back to "Object Mode" by selected that from the Popup menu where we set it to Vertex Paint. Our sphere turns gray again, but that's fine. The color is there whether you can see it or not.
For good measure, let's make sure our scale and transform was applied. I'm still fairly new to Blender and figuring things out myself. But I have run into problems before where I changed something in my model and no matter what I did, the change did not show up in the file I was exporting. I eventually discovered that you have to "Apply" the changes.
Next to the popup where it says "Object Mode" (and you should be in Object Mode to do this), there is a menu that says "Object". Click on that and select Object==>Apply==>Location to apply all changes to location. You may want to do Scale as well since we changed the scale. I expect if you make the changes when you initially create it, rather than later, you don't have to apply the changes. I'm not certain on that though.
Now we're finally ready to put this model in XNA as an .FBX model. Go to the File menu. File==>Export==>Autodesk FBX (.fbx).
Here on the Export screen, I unselect Empty, Camera, Lamp, Armature, and then leave Mesh on in blue. I select "XNA Strict Options" and uncheck pretty much everything else. You can play around with these settings. The worse that can happen is you don't export some piece of data like the Mesh itself. If you don't turn a bunch of stuff off, your file will be larger with junk data. No matter what you do, the file will be bloated with junk data. So, the smaller the better really.

I've tried playing with the axis options here, but I think it's broken. No matter what I did it did not change the fact that Blender records the model sideways. If you look in the bottom left corner of the main screen you can see the problem: the axis there. In Blender +Z is "up" and +Y is forward - which is negative Z in XNA. Honestly, I'm still not sure how to fix this. I generally fix it in code because I'm not sure you can ever trust the modeling program or the modelers themselves to position the model or scale it correctly for XNA, or in terms of scaling - even scale it correctly for some odd scale you've got going on in your game.
And that's it. You just have to move the .fbx file you created and any texture files associated with it (none for this exercise) to the Content folder of your XNA project and add them to the .fbx model to the project.
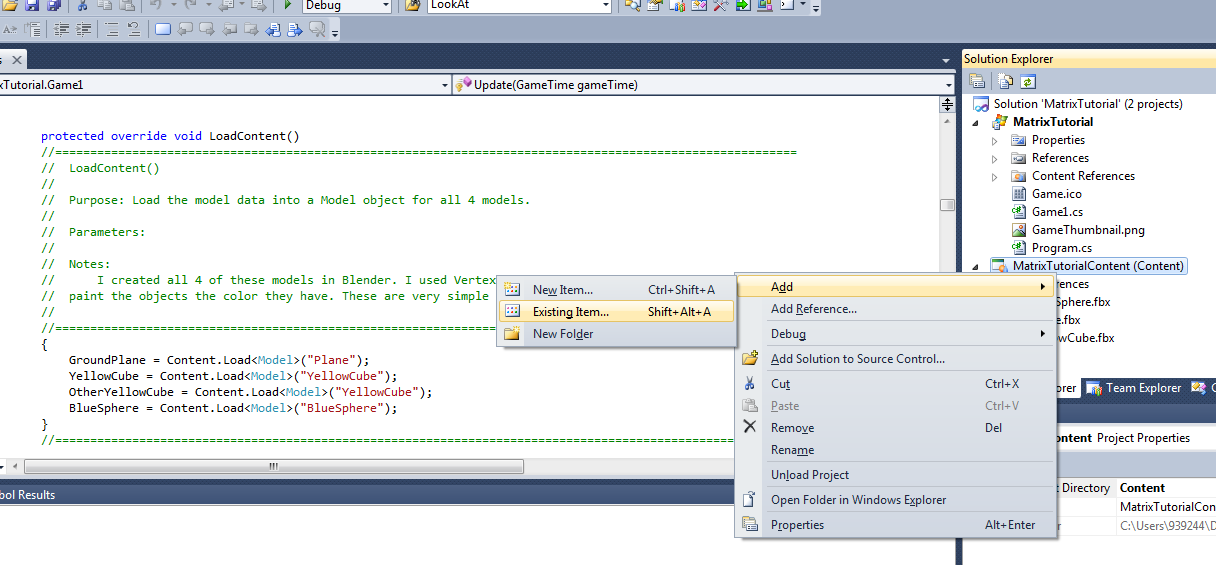
Import Your Models Into XNA
In your XNA project, you can import your Blender models pretty simply. Just right click on your content project in Solution Explorer. Select Add. And then click on Existing Item. Your .fbx files and any texture files should already be placed in this folder by you. So, select them and they should show up under your Content project.
You have to declare an instance of your Model class. And then load the data into the model object in the LoadContent() method. At that point your model is in XNA.
When you added it to the Content project, it is telling XNA to build a .XNB file out of the data in the .FBX file. Notice that in LoadContent() you never specify the file extension. That's because by the time the program gets to LoadContent() your .fbx file is history. Here it's loading the .XNB file which could have come from a .fbx file or a .x file. So, including the .fbx file extension in LoadContent() will give you an error.
The only remaining steps are to correct for Blender loading the models sideways and draw the models.
        protected override void LoadContent()
        //==========================================================================================================
        //  LoadContent()
        //
        //  Purpose: Load the model data into a Model object for all 4 models.
        //
        //  Parameters:
        //
        //  Notes:
        //      I created all 4 of these models in Blender. I used Vertex Painting mode (change from Object mode) to
        //  paint the objects the color they have. These are very simple models and have no texture in them.
        //
        //==========================================================================================================
        {
            GroundPlane = Content.Load<Model>("Plane");
            YellowCube = Content.Load<Model>("YellowCube");
            OtherYellowCube = Content.Load<Model>("YellowCube");
            BlueSphere = Content.Load<Model>("BlueSphere");
        }
        //==========================================================================================================
In the Initialize() method I added the line:
GroundPlanesWorldMatrix *= Matrix.CreateRotationX(-MathHelper.PiOver2);
which flips the green plane model over to correct for Blender exporting the model sideways. Two times pi is a full circle. So, pi is 180 degrees or a half circle. Pi divided by two is 90 degrees or one quarter circle. That's how you use radians. So, this is flipping it on the X axis by 90 degrees in the negative direction. As long as I never reset GroundPlanesWorldMatrix (by setting it equal to something that does not include itself), this correction will stay stored in that matrix.
I include the following code in my Draw() method to draw the green ground plane.
         //Draw the ground plane.
            foreach (ModelMesh Mesh in GroundPlane.Meshes)
            {
                foreach (BasicEffect Shader in Mesh.Effects) //Define an "effect" to draw our model with.
                {
                    Shader.World = GroundPlanesWorldMatrix;
                    Shader.View = ViewMatrix;
                    Shader.Projection = ProjectionMatrix;
                    Shader.LightingEnabled = true;
                    Shader.EnableDefaultLighting();
                    Shader.AmbientLightColor = Color.Gray.ToVector3();
                    Shader.DiffuseColor = Color.White.ToVector3();
                    Shader.SpecularColor = Color.White.ToVector3();
                }
                Mesh.Draw();  //Draw the mesh
            }
I switched from blue sphere to the green ground plane here because the plane is the only model that really needs to be corrected. All of the other models are symmetrical and so its impossible to know if they are sideways or not. Plus, the correction can make things a little more complicated when asking the object's world matrix for a vector that points in a given direction if the model is pointing in a different direction than the matrix is pointing in (which is basically the situation we have with Blender).
Really, you just repeat this whole process for every model you want. I used Yellow Cube twice. It's only one .fbx model, but I made it into two models in XNA.
And that's really all there is to it. We could have textured the model instead of coloring its vertices. You would want to do one or the other, but probably not both. We somewhat touched on texturing in the Holodeck tutorial. Basically, in Blender you would have assigned a material to the model. Then you would assign an image to the material. Then you UV unwrap the model to create your UV map. You may want to define seams before you unwrap. Then you export the image file of the UV map. Go into your paint program and paint the UV Map. Then reimport it as your texture. The UV map is then your texture file that needs to travel with the .fbx file. You don't have to include the texture in your Content project or load it separately. The texture information is in the .fbx file, but the texture file itself still has to be in the same folder as the .fbx file. I'll do a tutorial to explain this better at some point. In the meantime, just go on YouTube and look for tutorials on UV wrapping/unwrapping. Other than the texturing step. Everything else is identical to the process we've just covered here.
Oh. I almost forgot. There is one one step different for textured models. You have to turn textures on in the shader like this:
Shader.TextureEnabled = true;
Otherwise, your models will be drawn without their textures.
Summary
We cover the absolute basics of producing a model in Blender and how to import that model into your XNA games.