The Holodeck - Part III
Let's Write Some Code!
We've spent a lot of time creating a model for the room and a texture file to paint it with, but we haven't really done any XNA. So, let's get our files saved in the correct folder and then get to writing our program.
You can open up the Contents folder where all the artwork is usually stored, from the drop down menu on the Content folder in the Solution Explorer in VS 2010 Ultimate. For VS 2010 you have to right click on the .cs file's tab to get the "Open Containing Folder" option and then go up one folder level to find "Holodeck Content". That's a whole lot harder in Express than it is in VS 2010.

Put all of the art files in this folder including HoloDeckMesh.x and GridTexture.png and then right click on HolodeckContent again to select Add and Existing Item… and add in the .x and .png file.
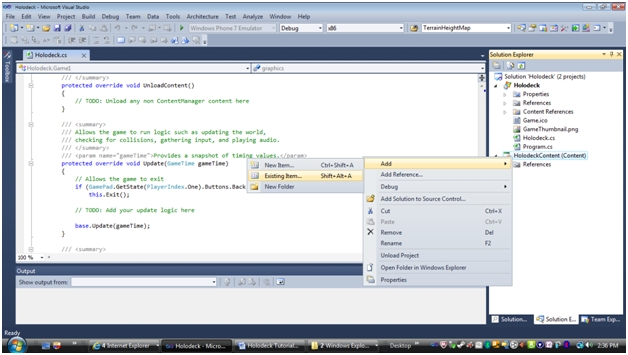
You should now have the mesh and picture file under "Holodeck Content" in the Solution Explorer pane.
The Code
Go to the declaration section of our Game1 class and add the following declarations. Rename the GraphicsDeviceManager to GraphicsManger and define a GraphicsDevice. The Graphics Device is “basically” your graphics card and device driver. The Graphics Manager is an object that kind of keeps track of your GraphicsDevices. You could have multiple graphics cards after all.
Add in fields to store our texture and model in the declaration section of our game class. Define a world matrix to hold our model’s position in the 3D world. Our model is defined in the file as being 2 units on every side and positioned with it’s center in the center of our 3D world. The center of our 3D world is called the origin and it has the x,y,z coordinates of 0,0,0. I want the bottom of our cube/model to be at a height of zero and in the file it draws it with the center at height zero. So, we need to move, or translate, it up half the height of the cube. We’ll do that later in the code. But here we create a World Matrix to store the cube/model’s position in for when we get ready to move it. I start it out equal to an identity matrix. An identity matrix is basically an empty matrix. What it has inside of it is more like the number 1, which is why it has the name “identity matrix”. When you multiply this matrix times something else the answer will be the same as that something else just like multiplying 1 time any number will equal that number. The identity matrix is usually used to empty a matrix out.
I’ll discuss matrices at a later time.
Declare a Matrix to store our View and Projection. I’ll go into those in more detail later, but for now just know that they are our “camera” to see into this 3D world.
Declare a BasicEffect. This is basically what they call a “shader”. BasicEffect can maybe thought of as the “artist” that will paint our screen. Remember, this 3D world we’re creating is illusionary; it’s just a bunch of numbers that get translated into colored pixel dots on our screen. The effect, or shader, is like an artist that knows certain techniques on how to paint a picture. The rasterizer is more like the brush that the artist uses. Rasterizing is basically “drawing the screen”. Merriam-Webster.com defines it like this:
a scan pattern (as of the electron beam in a cathode-ray tube) in which an area is scanned from side to side in lines from top to bottom; also: a pattern of closely spaced rows of dots that form an image (as on the cathode-ray tube of a television or computer display)
XNA has about 5 built in effects, but BasicEffect is the one you will use the most, especially starting out. Some books and tutorials will have you writing your own effects, or shaders, but that really isn’t necessary unless you have a specific reason for doing it. Other than a few special effects that you will likely copy from someone else’s code, you are not going to need, or be able, to write your own effects until you are well past understanding BasicEffect.
Declare a field for the camera position and the spot that the camera is looking at. There are a couple of things that may not be intuitive about this. One is that our camera has no “focus”. If you were a photographer I would tell you that it has an infinite “depth of field”. Basically, everything in front of the camera is always in focus unless you write an effect/shader to intentionally draw things out of focus. So, something an inch in front of the camera and something 10 miles in front of the camera can be in focus at the same time. That’s not exactly realistic, but that’s the way the camera works here in the computer world. So, keep that in mind when declaring your spot that the camera looks at. I like to tell the camera to look directly in front of itself, like “look 1 meter in front of the camera”. That avoids giving it a spot to look at. If it were focused on the spot 1 meter in front of the camera that wouldn’t work, but since everything deeper into the scene is in focus it’s like saying “just look in front of the camera”.
Another thing about these declarations are that they are vectors. More specifically they are 3 dimensional vectors. Helping you understand vectors will probably require me to write at least 10 to 20 pages. So, I don’t want to get very deep into the subject right now. With these particular “vectors”, they aren’t really vectors at all - or at least they’re sort of “quasi-vectors”; basically they are 3D coordinates stored in a vector object. Just think of these 3D vectors for camera position and camera look at spot as 3D coordinates for now. To pull off the trick I just mentioned about looking directly in front of the camera requires using the look at spot as an actual vector and vector math to make it work.
Define a constant to hold the size of our room. We’re going to use this to set the size of the holo-deck. In the .x file it’s defined 2 units wide. I’m going to think to myself that a unit is one meter, since that helps me keep things sized proportionally. So, I want the room to be larger than 2 meters wide and 2 meters tall. This constant will be multiplied times the size in the file to get the room size.
namespace Holodeck
{
    /// <summary>
    /// This is the main type for your game
    /// </summary>
    public class Game1 : Microsoft.Xna.Framework.Game
    {
        GraphicsDeviceManager GraphicsManager;  //Rename this like so.
        GraphicsDevice GraphicsCard;            //You can basically think of this as your graphics card or screen.
        SpriteBatch spriteBatch;                //You can leave this in even though we could remove it from this program.

        Texture2D GridTexture;  //Stores our texture in memory.
        Model HoloDeckModel;    //Stores our model in memory.
        Matrix HoloDeckModelWorldMatrix = Matrix.Identity;    //Stores the position and sizing info for our model.
        Matrix View;    //This stores the info for where our camera is positioned and what direction it's facing.
        Matrix Projection;  //Think of this as the "lens system" for our camera.
        //BasicEffect Shader; //This is like a "pen" that we'll be using to draw our world.
        Vector3 CameraPostion;  //This is just going to be x,y,z coordinates that stores our camera's location.
        Vector3 CameraLookAt;   //This is the spot the camera is "looking" at in our 3D world.
        const float HoloDeckWidth = 200f;    //Our model is 2 units cubed. This will be the number to multiply that size by.

        public Game1()
        {
The next change we’re going to make is in our Game1 object’s “constructor” method. Being a C# programmer, you should know that the constructor is code that’s going to run when you create an actual instance of the Game1 object. So, it’s always the first code to run.
You usually don’t mess with the Game1 constructor much. I’m going to change the name of the GraphicsDeviceManager to something a bit more descriptive and in line with my Pascal case writing. And since I’ve just setup the GraphicsManager here I might as well set its starting conditions here. I’m going to tell it what screen size to run at and to not run full screen.
The backbuffer is where stuff gets drawn. After everything is drawn, XNA will dump everything from the backbuffer to the frontbuffer. For all practical purposes, the frontbuffer is your screen. So, your backbuffer size needs to match the screen resolution you want. XNA will figure something out on its own if you don’t tell it what you want.
Also, I have a 16:9 aspect ratio on my screen. The aspect ratio is the ratio of the width to the height. Old screens had 4:3 aspect ratios. The new HDTVs have a 16:9 ratio, and that’s what I’m working on. A lot of stuff defaults to a 4:3 ratio, and so I wanted to tell XNA what I want right up front whether it’s necessary or not.
I like to run full screen. It just looks better and is less distracting with things in the background. For 2D work I think it might feel more natural to work in windowed mode, but I strongly prefer full screen for 3D. That being said, you don’t want to start out in full screen mode. The problem is that sometimes your code will have bugs in it, and sometimes it will crash. In full screen mode, that may mean you lose control of the program and can’t tell the program to give you back the screen. So, you’ll be stuck and it’s not pretty; I’ve been there a couple of times. When, and notice I didn’t say “if”, you get stuck like this it’s usually possible to get out by using something like Ctrl+Alt+Del and just killing your program in memory. To prevent this situation, run in windowed mode. Once you get the program working pretty well without crashing you can switch to full screen.
This “may” be about the most you ever change the Game1 constructor method.
       public Game1()
        {
            GraphicsManager = new GraphicsDeviceManager(this);  //Since we renamed this it has to be changed here too.
            //Changing the backbuffer is not absolutely necessary. I have a 16:9 screen and I like
            //to set the backbuffer to what I want it to be rather then let XNA pick for me.
            //The backbuffer is where things are drawn. Once the drawing is complete and ready to
            //be displayed on the screen the drawing on the backbuffer is sent to the front buffer.
            //The front buffer is basically your screen. That's why the size needs to match the
            //resolution of your screen.
            GraphicsManager.PreferredBackBufferWidth = 1280;    //Screen width horizontal. Change this to fit your screen.
            GraphicsManager.PreferredBackBufferHeight = 720;    //Screen width vertical. Change this to fit your screen.
            //You can run your game in full screen or windowed mode. Sometimes you write bugs
            //into your code that make it hard to recover in full screen mode. (Try Alt+F4 or
            //Ctrl+Alt+Del to get control in those situations.)
            GraphicsManager.IsFullScreen = false;  //Feel free to set this to true once your code works.

            Content.RootDirectory = "Content";
        }
In the Load Content method, add the following code
to load our texture and model into memory. What we’re doing here with
the texture is actually unnecessary because the texture name is in the
model. However, this isn’t going to hurt anything and you can change the
texture to something else this way. For example, you could start the
game with this texture and later set it to something else or even set it
to something else right here. This texture will override the texture
name stored in the model. But without this, XNA would just try and use
the name of the texture provided in the .x file. If it can’t find the
file it will just load the model without a texture.
I don’t want to get into explaining Matrices right here. But we need a matrix to set our room’s size and placement in our 3D world.
protected override void LoadContent()
        {
            // Create a new SpriteBatch, which can be used to draw textures.
            spriteBatch = new SpriteBatch(GraphicsDevice);

            // TODO: use this.Content to load your game content here
            GridTexture = Content.Load<Texture2D>("GridTexture");   //Load the Grid texture into memory from disk.
            HoloDeckModel = Content.Load<Model>("HoloDeckMesh");    //Load our .X file model for the room into memory.
            HoloDeckModelWorldMatrix = Matrix.Identity * Matrix.CreateScale(100f);   //Resize our model 100 times larger.

        }
Now, we change the Initialize method for our Game1 class. This code is going to run when the game starts and you want to use it to do “setup” type work. There’s a Load method that also runs at startup. But the load method is “supposed” to be used for loading artwork/content into memory. Initialize is for setting up non-artwork when the game starts.
Mainly, I’m just creating a BasicEffect, setting up the camera, and changing the title of the window that will appear in the upper left corner of the window when in windowed mode. I also changed the name of the GraphicsDeviceManager.
I probably need to write a separate tutorial on
matrices, to do the explanation justice. But for now, you can basically
just think of them as “black boxes” that you load up with math formulas.
And the 3 matrices that you’ll mostly be working with have very specific
purposes.
First we setup the Projection matrix. You can kind of think of this as our camera’s lens system. One of the first things you do is give it a “Field of View”. Field of view is the angle of the area that the camera shows. Basically, it’s how wide the picture is in terms of angle. This is a lot of the reason people like to think of this as a lens; 45 degrees is pretty normal, but as you increase the angle towards 180 you get more and more of a “fish eye” lens effect. Just set it to 45 degrees and forget about it. Incidentally, you should probably use radians instead of degrees, because that’s what the computer likes. But this line is only called once, and it makes for a clear example if we use MathHelper to convert degrees to radians.
Next I ask the graphics card what the current aspect ratio is and match the camera to that. And then we get into the near and far clipping planes. If you were a photographer, I might tell you that this is a little like depth of field on the camera except, instead of controlling what’s in focus, it’s all in focus and everything outside of this field doesn’t get drawn at all. It exists to make your game run faster by not drawing stuff that doesn’t need to be drawn. Basically, you are telling XNA “don’t draw anything closer than the near clipping plane distance” and “don’t draw anything further away than the far clipping plane distance”.
protected override void Initialize()
        {
            // TODO: Add your initialization logic here
            GraphicsCard = GraphicsManager.GraphicsDevice;  //Introduce the Graphics Manager to our graphics card.
            Window.Title = "The Holo-Deck"; //Your window's title displays in the top left corner in windowed mode.

            //We need to load up our projection matrix with our camera's Field of View,
            //our screen aspect ratio, and the clipping planes. Changes this are only
            //updated when you change the aspect ratio, I believe. So it's pretty much
            //set it up once and leave it alone.
            Projection = Matrix.CreatePerspectiveFieldOfView(MathHelper.ToRadians(45f),
                GraphicsCard.Adapter.CurrentDisplayMode.AspectRatio, 0.1f, 10000f);

            CameraPostion = new Vector3(0f, 1f, 0f);    //Start the camera in the center of our world but 1 unit above ground.
            CameraLookAt = CameraPostion + Vector3.Forward;
            //Think of the View Matrix as our camera. I'm loading it with our 3D position. And
            //then I'm telling it to look straight forward by telling it to look at a point
            //that is 1 unit directly in front of the camera. Vector3.Forward is a unit
            //vector of 1 length that points in the forward direction, but it's tail
            //is at 0,0,0 and we need it to be pointing "from" the camera. Instead of
            //defining it this way you can just load up a Vector3 with the position
            //you want it to look at just like we did with Camera position.
            //CreateLookAt wants you to define "up" for it and so you send it an up vector.
            View = Matrix.CreateLookAt(CameraPostion, CameraLookAt, Vector3.Up);


            base.Initialize();
        }
Like I said, LoadContent is for loading artwork
into memory, and that’s what we do here.
        protected override void LoadContent()
        {
            // Create a new SpriteBatch, which can be used to draw textures.
            spriteBatch = new SpriteBatch(GraphicsDevice);

            // TODO: use this.Content to load your game content here
            GridTexture = Content.Load<Texture2D>("GridTexture");   //Load the Grid texture into memory from disk.
            HoloDeckModel = Content.Load<Model>("HoloDeckMesh");    //Load our .X file model for the room into memory.

            //We load up a CreateScale matrix to resize our model since it's about 2 units cubed in size.
            //The CreateScale matrix will have the info in it to correctly size our model according to the value
            //we pass to it. We combine it (through multiplication) with a CreateTranslation matrix loaded
            //up with a position change that moves our model upwards by half the width of our cube.
            HoloDeckModelWorldMatrix = Matrix.CreateScale(HoloDeckWidth) * Matrix.CreateTranslation(0.0f,HoloDeckWidth,0.0f);   //Resize our model larger and move it.

        }
I’ve never used UnloadContent. Other than the obvious name, I’m not sure what it’s used for. I hope to figure it out some day. C# is “managed” code and it has a garbage collector that cleans up everything for you. I suspect this is here to give you a chance to help the garbage collector out by doing its job before the garbage collector can get around to it. I don’t think I’ve ever seen a tutorial or book example that made use of it, but I’ll keep looking.
We’ll get to the Update method shortly, but so far I haven’t changed it. Notice, that the only way to get out of the game, right now, is to use your Xbox360 controller. You do have an Xbox360 controller, don’t you? Seriously though, get an Xbox360 controller for your PC if you don’t have one.
You may want to change Update to allow you to get out of the game by pressing a key right now, but an XNA game is a Windows window. So like all windows, you can close it with Alt+F4. Remember that because otherwise you’re going to be in trouble in full screen mode.
Finally, we’re at the Draw method. The Draw method is for one thing: drawing on the screen. You really shouldn’t be putting game logic in here, that’s what the Update method is for. What’s happening in your 3D world is for the Update method. Showing it is for the Draw method.
The first thing that happens is some changes to the rasterizer, which – as I explained – draws the dots on your screen like the brush of an artist. You don’t need to mess with the rasterizer, but I wanted to make sure that culling is set properly. Culling just means separating out the bad from the good. It takes time to draw the triangles in your 3D world. Well, maybe I should mention first that everything you see in this 3D world is actually made up of triangles whether you realize it or not. XNA isn’t capable of drawing anything on the screen that isn’t a line or a triangle.
So anyway, it takes time to draw triangles and if your game doesn’t run fast enough, it will hesitate, act jerky, and not be any fun to play. So, you need to constantly be thinking “how can I make my code run faster”. At first you will find it very hard to draw enough triangles on the screen to slow down a reasonably modern computer, but when it happens you’re going to have to figure out how to draw the same scene using fewer triangles. So you might as well be thinking about that from the very start. That way it will take longer to reach that point.
The point is that that’s what culling is all about. Culling is where XNA throws out, or rather – doesn’t draw, triangles that “can’t be seen”. Triangles that face the camera should be drawn, but triangles faces that are on the inside of an object should usually never be seen. If you never see the inside, then there’s no point in drawing that side. So backface culling just tells XNA, don’t bother drawing the insides of objects because we’ll never see them anyway.
The visible side of a triangle is defined by the “winding order” when you define the indices for your triangle. In our model, the .x format allowed us to define quads instead of triangles, but we still wound them in clockwise order. Since we’re using this cube as a “room”, we should always be “inside” the room and never on the outside. So, there’s no point in drawing the outside of the room because that’s just out in “empty space” where our camera should never be allowed to go.
However, to get us started, I wanted to turn backface culling off so that if we just “happen” to end up outside of the room we can still see where the room is at. Once you get your program working correctly, you always turn on backface culling before releasing a final game.
By not wasting time drawing unseen triangles, your game will run a lot faster.
    protected override void Draw(GameTime gameTime)
        {
            GraphicsDevice.Clear(Color.CornflowerBlue);

            // TODO: Add your drawing code here
            //Normally you don't HAVE to change the RasterizerState but we want to change the
            //CullMode. The rasterizer is part of the screen drawing mechanism and we're telling
            //XNA how things should be drawn. The cull mode tries to cull out triangles that don't
            //"need" to be drawn. The default is CullCounterClockwiseFace which tells XNA not to
            //draw the back sides of triangles. Most of the time this makes sense; you can't "see"
            //the triangles that are facing away from you, so why draw them; it's just wasting CPU
            //time. It decides which side is the front of the triangle by the cull mode and the
            //direction you "wind", or define, the vertices in. This is why you should always
            //wind your vertices clockwise according to the direction you want them to face.
            //Since we're debugging, there's a good chance that we messed up and wound our
            //vertices in the wrong direction. So, we turn off culling and draw both sides of
            //all triangles by setting the cull mode to None. Once we get the program working,
            //we can change CullMode back to CullCounterClockwiseFace and our game will run
            //faster.
            RasterizerState RS = new RasterizerState();
            RS.CullMode = CullMode.None;
            RS.FillMode = FillMode.Solid;
            GraphicsCard.RasterizerState = RS;


            foreach (ModelMesh Mesh in HoloDeckModel.Meshes)
            {
                //Here we define an effect. The effect is kind of like the pen or brush that we will "draw" our
                //3D world with. It's basically what they call a "shader". Shaders are code that draw things on
                //the screen. XNA 4.0 has about 5 different effects, or shaders, built into it. BasicEffect is the one
                //you will use most of the time. The others are more for special purposes.
                //We're loading up a BasicEffect here so that we can use it. We could have loaded up one of the other
                //effects or written our own effect and loaded it up. Writing your own effects is done in a language
                //called HLSL (High Level Shader Language). You don't really need to do that starting out though;
                //because BasicEffect does a pretty good job and you really need to know what you're doing to write a
                //shader that does a better job drawing the screen than the built in effects.
                foreach (BasicEffect Shader in Mesh.Effects) //Define an "effect" to draw our model with.
                {
                    Shader.EnableDefaultLighting();
                    Shader.TextureEnabled = true;   //We're going to draw using a texture.
                    Shader.Texture = GridTexture;   //The model will draw without this call, but it will use the texture in the file.
                    Shader.LightingEnabled = false; //Don't use BasicEffect's "advanced" lighting for now.
                    Shader.World = HoloDeckModelWorldMatrix;    //Tell the shader what World Matrix to use to draw the object.
                    Shader.View = View;             //Tell the shader where to draw from (the camera).
                    Shader.Projection = Projection; //Tell the shader how to draw (like the camera lens... sort of).
                }
                Mesh.Draw();  //Draw the mesh
            }

            base.Draw(gameTime);    //Always include this.
        }
Build the code by hitting the F7 key (or chose the option on the build menu). And then run the game by hitting the F5 key (or chose Start Debugging from the Debug menu). Don’t forget that you can hit Alt+F4 to get out. You should just see our texture all over the screen.
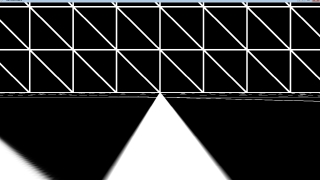
Ok. I have to admit that was a lot of work for something so unimpressive. The biggest problem is that we’re in a “room” (our holodeck), but we can’t move the camera to look around. I think that needs to be our next priority. So make the following changes to the Update method. Basically, we're just adding code to move the camera forwards and backwards with the W and S keys or the up and down arrow. This is a terrible "camera". A "camera" is code that moves the view around. The code here doesn't do it very well, but it at least allows you to kind of see the room is 3D. In the next part we'll add a proper camera.
protected override void Update(GameTime gameTime)
        {
            KeyboardState KBState;
            // Allows the game to exit
            if (GamePad.GetState(PlayerIndex.One).Buttons.Back == ButtonState.Pressed)
                this.Exit();

            // TODO: Add your update logic here
            KBState = Keyboard.GetState();
            if (KBState.IsKeyDown(Keys.Escape)) this.Exit();

            float Speed = 1f;
            if (KBState.IsKeyDown(Keys.Up) || KBState.IsKeyDown(Keys.W))
            {
                CameraPostion += Vector3.Forward * Speed;
                CameraLookAt = CameraPostion + Vector3.Forward;
            }

            if (KBState.IsKeyDown(Keys.Down) || KBState.IsKeyDown(Keys.S))
            {
                CameraPostion += Vector3.Backward * Speed;
                CameraLookAt = CameraPostion + Vector3.Forward;
            }

            View = Matrix.CreateLookAt(CameraPostion,CameraLookAt, Vector3.Up);


            base.Update(gameTime);
        }
And so at this point, you should have code like what is shown below in the Complete Source Code listing:
Complete Source Code
using System;
using System.Collections.Generic;
using System.Linq;
using Microsoft.Xna.Framework;
using Microsoft.Xna.Framework.Audio;
using Microsoft.Xna.Framework.Content;
using Microsoft.Xna.Framework.GamerServices;
using Microsoft.Xna.Framework.Graphics;
using Microsoft.Xna.Framework.Input;
using Microsoft.Xna.Framework.Media;

namespace Holodeck
{
    /// <summary>
    /// This is the main type for your game
    /// </summary>
    public class Game1 : Microsoft.Xna.Framework.Game
    {
        GraphicsDeviceManager GraphicsManager;  //Rename this like so.
        GraphicsDevice GraphicsCard;            //You can basically think of this as your graphics card or screen.
        SpriteBatch spriteBatch;                //You can leave this in even though we could remove it from this program.

        Texture2D GridTexture;  //Stores our texture in memory.
        Model HoloDeckModel;    //Stores our model in memory.
        Matrix HoloDeckModelWorldMatrix = Matrix.Identity;    //Stores the position and sizing info for our model.
        Matrix View;    //This stores the info for where our camera is positioned and what direction it's facing.
        Matrix Projection;  //Think of this as the "lens system" for our camera.
        //BasicEffect Shader; //This is like a "pen" that we'll be using to draw our world.
        Vector3 CameraPostion;  //This is just going to be x,y,z coordinates that stores our camera's location.
        Vector3 CameraLookAt;   //This is the spot the camera is "looking" at in our 3D world.
        const float HoloDeckWidth = 200f;    //Our model is 2 units cubed. This will be the number to multiply that size by.

        public Game1()
        {
            GraphicsManager = new GraphicsDeviceManager(this);  //Since we renamed this it has to be changed here too.
            //Changing the backbuffer is not absolutely necessary. I have a 16:9 screen and I like
            //to set the backbuffer to what I want it to be rather then let XNA pick for me.
            //The backbuffer is where things are drawn. Once the drawing is complete and ready to
            //be displayed on the screen the drawing on the backbuffer is sent to the front buffer.
            //The front buffer is basically your screen. That's why the size needs to match the
            //resolution of your screen.
            GraphicsManager.PreferredBackBufferWidth = 1280;    //Screen width horizontal. Change this to fit your screen.
            GraphicsManager.PreferredBackBufferHeight = 720;    //Screen width vertical. Change this to fit your screen.
            //You can run your game in full screen or windowed mode. Sometimes you write bugs
            //into your code that make it hard to recover in full screen mode. (Try Alt+F4 or
            //Ctrl+Alt+Del to get control in those situations.)
            GraphicsManager.IsFullScreen = false;  //Feel free to set this to true once your code works.

            Content.RootDirectory = "Content";
        }

        /// <summary>
        /// Allows the game to perform any initialization it needs to before starting to run.
        /// This is where it can query for any required services and load any non-graphic
        /// related content.  Calling base.Initialize will enumerate through any components
        /// and initialize them as well.
        /// </summary>
        protected override void Initialize()
        {
            // TODO: Add your initialization logic here
            GraphicsCard = GraphicsManager.GraphicsDevice;  //Introduce the Graphics Manager to our graphics card.
            Window.Title = "The Holo-Deck"; //Your window's title displays in the top left corner in windowed mode.

            //We need to load up our projection matrix with our camera's Field of View,
            //our screen aspect ratio, and the clipping planes. Changes this are only
            //updated when you change the aspect ratio, I believe. So it's pretty much
            //set it up once and leave it alone.
            Projection = Matrix.CreatePerspectiveFieldOfView(MathHelper.ToRadians(45f),
                GraphicsCard.Adapter.CurrentDisplayMode.AspectRatio, 0.1f, 10000f);

            CameraPostion = new Vector3(0f, 1f, 0f);    //Start the camera in the center of our world but 1 unit above ground.
            CameraLookAt = CameraPostion + Vector3.Forward;
            //Think of the View Matrix as our camera. I'm loading it with our 3D position. And
            //then I'm telling it to look straight forward by telling it to look at a point
            //that is 1 unit directly in front of the camera. Vector3.Forward is a unit
            //vector of 1 length that points in the forward direction, but it's tail
            //is at 0,0,0 and we need it to be pointing "from" the camera. Instead of
            //defining it this way you can just load up a Vector3 with the position
            //you want it to look at just like we did with Camera position.
            //CreateLookAt wants you to define "up" for it and so you send it an up vector.
            View = Matrix.CreateLookAt(CameraPostion, CameraLookAt, Vector3.Up);


            base.Initialize();
        }

        /// <summary>
        /// LoadContent will be called once per game and is the place to load
        /// all of your content.
        /// </summary>
        protected override void LoadContent()
        {
            // Create a new SpriteBatch, which can be used to draw textures.
            spriteBatch = new SpriteBatch(GraphicsDevice);

            // TODO: use this.Content to load your game content here
            GridTexture = Content.Load<Texture2D>("GridTexture");   //Load the Grid texture into memory from disk.
            HoloDeckModel = Content.Load<Model>("HoloDeckMesh");    //Load our .X file model for the room into memory.

            //We load up a CreateScale matrix to resize our model since it's about 2 units cubed in size.
            //The CreateScale matrix will have the info in it to correctly size our model according to the value
            //we pass to it. We combine it (through multiplication) with a CreateTranslation matrix loaded
            //up with a position change that moves our model upwards by half the width of our cube.
            HoloDeckModelWorldMatrix = Matrix.CreateScale(HoloDeckWidth) * Matrix.CreateTranslation(0.0f,HoloDeckWidth,0.0f);   //Resize our model larger and move it.

        }

        /// <summary>
        /// UnloadContent will be called once per game and is the place to unload
        /// all content.
        /// </summary>
        protected override void UnloadContent()
        {
            // TODO: Unload any non ContentManager content here
        }

        /// <summary>
        /// Allows the game to run logic such as updating the world,
        /// checking for collisions, gathering input, and playing audio.
        /// </summary>
        /// <param name="gameTime">Provides a snapshot of timing values.</param>
        protected override void Update(GameTime gameTime)
        {
            KeyboardState KBState;
            // Allows the game to exit
            if (GamePad.GetState(PlayerIndex.One).Buttons.Back == ButtonState.Pressed)
                this.Exit();

            // TODO: Add your update logic here
            KBState = Keyboard.GetState();
            if (KBState.IsKeyDown(Keys.Escape)) this.Exit();

            float Speed = 1f;
            if (KBState.IsKeyDown(Keys.Up) || KBState.IsKeyDown(Keys.W))
            {
                CameraPostion += Vector3.Forward * Speed;
                CameraLookAt = CameraPostion + Vector3.Forward;
            }

            if (KBState.IsKeyDown(Keys.Down) || KBState.IsKeyDown(Keys.S))
            {
                CameraPostion += Vector3.Backward * Speed;
                CameraLookAt = CameraPostion + Vector3.Forward;
            }

            View = Matrix.CreateLookAt(CameraPostion,CameraLookAt, Vector3.Up);


            base.Update(gameTime);
        }

        /// <summary>
        /// This is called when the game should draw itself.
        /// </summary>
        /// <param name="gameTime">Provides a snapshot of timing values.</param>
        protected override void Draw(GameTime gameTime)
        {
            GraphicsDevice.Clear(Color.CornflowerBlue);

            // TODO: Add your drawing code here
            //Normally you don't HAVE to change the RasterizerState but we want to change the
            //CullMode. The rasterizer is part of the screen drawing mechanism and we're telling
            //XNA how things should be drawn. The cull mode tries to cull out triangles that don't
            //"need" to be drawn. The default is CullCounterClockwiseFace which tells XNA not to
            //draw the back sides of triangles. Most of the time this makes sense; you can't "see"
            //the triangles that are facing away from you, so why draw them; it's just wasting CPU
            //time. It decides which side is the front of the triangle by the cull mode and the
            //direction you "wind", or define, the vertices in. This is why you should always
            //wind your vertices clockwise according to the direction you want them to face.
            //Since we're debugging, there's a good chance that we messed up and wound our
            //vertices in the wrong direction. So, we turn off culling and draw both sides of
            //all triangles by setting the cull mode to None. Once we get the program working,
            //we can change CullMode back to CullCounterClockwiseFace and our game will run
            //faster.
            RasterizerState RS = new RasterizerState();
            RS.CullMode = CullMode.None;
            RS.FillMode = FillMode.Solid;
            GraphicsCard.RasterizerState = RS;


            foreach (ModelMesh Mesh in HoloDeckModel.Meshes)
            {
                //Here we define an effect. The effect is kind of like the pen or brush that we will "draw" our
                //3D world with. It's basically what they call a "shader". Shaders are code that draw things on
                //the screen. XNA 4.0 has about 5 different effects, or shaders, built into it. BasicEffect is the one
                //you will use most of the time. The others are more for special purposes.
                //We're loading up a BasicEffect here so that we can use it. We could have loaded up one of the other
                //effects or written our own effect and loaded it up. Writing your own effects is done in a language
                //called HLSL (High Level Shader Language). You don't really need to do that starting out though;
                //because BasicEffect does a pretty good job and you really need to know what you're doing to write a
                //shader that does a better job drawing the screen than the built in effects.
                foreach (BasicEffect Shader in Mesh.Effects) //Define an "effect" to draw our model with.
                {
                    Shader.EnableDefaultLighting();
                    Shader.TextureEnabled = true;   //We're going to draw using a texture.
                    Shader.Texture = GridTexture;   //The model will draw without this call, but it will use the texture in the file.
                    Shader.LightingEnabled = false; //Don't use BasicEffect's "advanced" lighting for now.
                    Shader.World = HoloDeckModelWorldMatrix;    //Tell the shader what World Matrix to use to draw the object.
                    Shader.View = View;             //Tell the shader where to draw from (the camera).
                    Shader.Projection = Projection; //Tell the shader how to draw (like the camera lens... sort of).
                }
                Mesh.Draw();  //Draw the mesh
            }

            base.Draw(gameTime);    //Always include this.
        }
    }
}
Summary
In this part, we finally start writing some code. We write the code to build our holodeck room model. And we introduce an overly simplistic camera movement, in order to allow you to change positions and see that we actually are working in 3D.
We'll still need to add a model to the scene and build a camera that will allow us to move freely around the room. And we'll do that and more in upcoming parts of this lesson.