The Holodeck - Part II
Creating Textures with Paint.Net
So, we told our .X file to use the "GridTexture.png" file to paint our model. However, no such file yet exists.
In order to "paint" our model, we have to use a picture file. Photograph files that are used to paint models are called "textures". The really cool thing about that is that you can use actual realistic photographs to make your models look a lot more realistic, and we will do that eventually. Right now, I wanted to show you that you can create these photograph/texture files by hand and draw them yourself. This is an extremely powerful technique because not only can you draw your textures yourself, but you can go out with your camera, snap a picture of some surface, and then use that actual photograph to "paint" your model. But even beyond that, you can use a flatbed scanner to scan in any image that will go in the scanner. So that means you could do a watercolor or oil painting, scan it in with a scanner, and then use it to paint your model. The biggest limitation with this technique is your imagination.
Covering models with photographs is not the only technique for drawing models. Early on models were done as wireframes where they were nothing but white lines on a black background. We will explore this technique a little more in a later tutorial.
After that in history, they realized that they could draw a colored surface in between the lines. This is a really old technique, and I don't know that we'll explore that at all. It generally resulted in everything looking like it was drawn by a computer. A fairly advanced version of that technique would give you models that looked something like the early computer animation movies, like Toy Story. It's just not used much anymore because it looks very "computer generated".
Finally, they figured out that they could draw a photograph in between the lines, and that's the technique that we're using here. Even more advanced drawing methods, such as bump mapping, are still basically using the same technique of drawing using a picture file. So, you're going to be stuck with this UV mapping thing for a long time.
But to work with any texture, you need photo editing software to edit the image. I've selected Paint.Net for our tutorials, because it was recommended to me, and you can get it for free. They've got a lot of links there where you can accidently install the wrong software, be careful of that.
http://www.getpaint.net/index.html
The installation of Paint.Net is pretty straight forward. Once you get it installed, we will use it to create the texture that we are going to use to "wall paper" the holodeck with.
Open up Paint.Net and select New on the File menu. You should see the screen below:
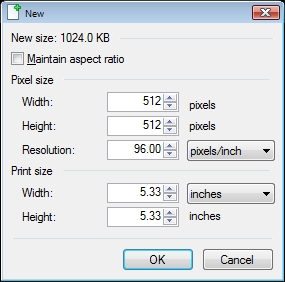
Change the Width and Height to 512 pixels/inch. This will be the size of your texture.
Texture File Sizes
Maybe this is too much of a beginner tutorial to discuss this, but since we are making our own texture from scratch, I should probably talk about texture sizes.
You can save your textures in several different photo formats. For this tutorial we're using PNG's because Paint.Net likes them and XNA likes them too. But regardless of what photo format you use, you need to give some serious thought to the size of all the game textures and photographs you create.
When creating your own picture files to be used in a game you want to make sure that both the width and the height are some "doubling" of eight. So that means their size should be 8, 16, 32, 64,128, 256, 512, or 1024. Sizes above 1024 are generally a bad idea unless you plan this to only run on hardware designed well after 2012. Even 1024 is considered overly huge by most modern standards. I should also add that a size of 1, 2, or 4 is acceptable, if you need that file size for a specific purpose. I barely remember that we had a "trick" that we used to do years ago with an image that was 1 by 1 in size.
This rule not only applies to textures. It also applies to Bitmaps, Heightmaps, Bumpmaps, or anything else you use a picture file for in XNA.
Now your picture files don't have to be square. They can be rectangular and that's fine. But both height and width should be one of the numbers mentioned above in all cases.
The more you work with computers, the more that you will see these numbers repeated all over the place. For example, 1KB of memory is not 1,000 bytes. It's 1,024 bytes. You will see memory sold in sticks that jump in size between 256, 512, 1024 and the other numbers mentioned.
The reason for this is that computer do all their "magic" using bytes. A byte is 8 microscopic electronic switches that can be set in 256 different combinations. The switches are called "bits" and they can be either on or off. Since everything that goes on in the computer is managed by these 8 bit bytes you get "boundaries" that fall in numbers that are multiples of eight.
For example, one byte can point to 256 different memory locations because it can be up to 256 different values. You "could" only use 250 memory locations, but it's going to take one byte to manage the memory locations whether you only use 250 of them or use the full 256. And a byte can't be broken down into a smaller size unit. So the second you have 257 locations to manage you have to assign another byte to keep track of 257 values. Since you've already "burned' the second byte you "might as well" go ahead and just use the two bytes to track 512 locations. Otherwise you're wasting most of that second byte.
So, the reason you need all your files to have a width and height that is one of the "doublings" of eight above is so that you aren't wasting huge amounts of your computer's memory. The bottom line is that it takes the same amount of memory to store a photo that is 257 by 256 as it does to store a photo that is 512 by 256. So, you might as well just go ahead and make it 512 by 256 because you're "paying" for the full amount whether you use it or not. So you might as well use it. If 512 by 256 consumes too much memory then you have to reduce it back down to 256 by 256 or 256 by 128 to maintain the same shape, because if you don't reduce it by at least that much you haven't reduced the memory it takes to store the photo.
Making Your Own Custom Textures
Ok. So let's get to creating an actual game texture. Go back into Paint.Net.
You should have a white texture. I want it to mostly be black. So, let’s select the Paint Bucket tool over on the left side tool bar and right click on the white field to select the “alternate” color which should already be set to black.
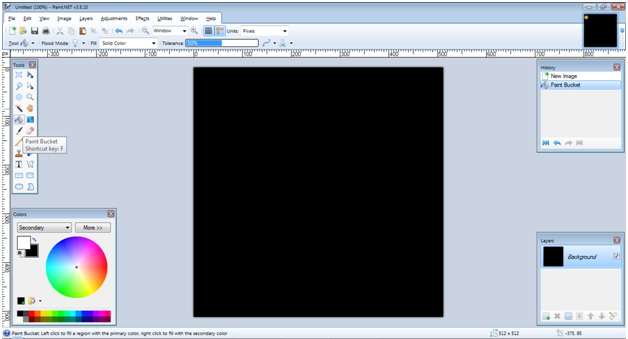
I have the Rulers turned on in the View menu to help measure things.
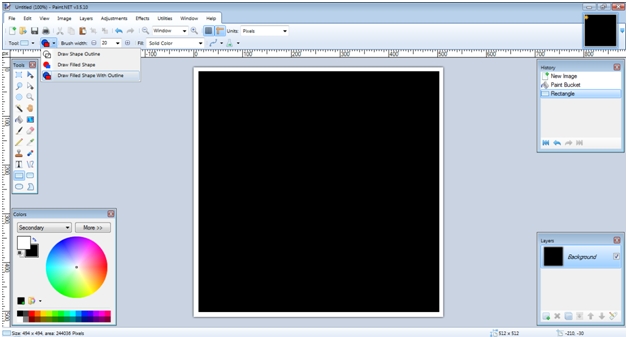
Next I just want to draw a white outline on the edges. Select the Rectangle tool from the same toolbar and then make sure that “Draw Filled Shape With Outline” is selected. Also, change the Brush Width to 20. It’s kind of hard to get this perfect. There may be a “snap to grid” option in Paint.Net but I don’t know where it is. Try to get it as perfect as you can in a minute or two, but it doesn’t have to be perfect. Mainly, you just want the white to run out all the way to the edges because the white edges are going to be touching white edges. But it’s not going to be a big deal if you don’t get it perfect. Just draw a white box around the edges.
Next, select the “Line/Curve” tool and draw a big white diagonal line.
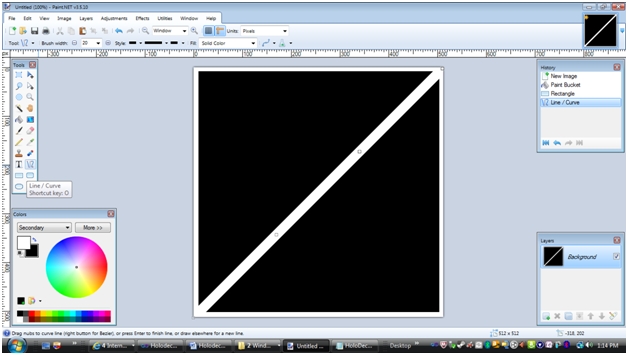
Go to the File menu and select “Save As”. The defaults seem to work just fine as XNA reads .png files. Save it as "GridTexture.png" in order to make it match the file name in our .X file that we created.
There’s nothing special about this texture, as you can see. I just wanted something that looks kind of “holodeck”ish. And I want to use this texture again later for another game tutorial.
If you want to download the file instead of creating it, you can get the file with this link.
The thing to “take away” here is that you can make your own textures. It’s not that hard. We drew this texture by hand. But the files we produce, like JPEGs and PNG files, are photographs. So, you could take your camera out and shoot a picture. Then you would cut it down to 512 by 512, or whatever size for your texture and touch it up to make it look right. Viola! Realistic looking texture. But realism is over-rated. You could also do something artistic. You could go buy some crayons and some good paper along with a flat bed scanner (they aren’t that expensive these days). Then you could draw your textures with crayons and scan them in as a JPEG or PNG file. Or, if you’ve actually got some painting talent, you could do an oil painting (let it dry of course) and then scan that in as a JPEG or PNG file. The only limit here is your imagination.
And while we’re on the subject of getting all artistic with your textures, I wanted to recommend MyPaint to you. I’m sure you get what you pay for to a certain extent, but it seem that with digital art tools there are now a lot of really phenomenal tools out there for free.
MyPaint is a digital … I don’t know what to call it … digital art studio. It allows you to “paint” in all sorts of mediums like water colors, air brush, pencil, ink, charcoal, and various forms of paint using all sorts of “brushes”. Don’t get me wrong. Just like a paint brush won’t paint for you or make you a great painter, neither will this. But if you’re gonna paint, you’ve gotta have a brush. I “will” warn you though; you’ll probably get the best use out of it if you buy a graphics tablet (like the Bamboo) to use with it, because a mouse won’t be pressure sensitive and the tablet may be easier to draw with. Even if you’re not artistically talented, I would recommend trying it out. I may use it in a later tutorial.
Summary
In this part we are going to continue discussing how we "paint", or texture, models. And we are going to create the picture that our holodeck room/cube will be "wall papered", or textured, with. The example is going to walk you through the creation of a texture file using the freely available Paint.Net photo editing software. By walking you through the process of creating a picture file to use for the model, you will start to see that any photograph can be used for this process and how you can manipulate those photographs to make your models look the way you want them to look.