Part I - Textured Models
In the second tutorial, "Matrices In Motion", we covered how to create basic models in Blender. Here we do the same thing, but make the models more complex by sculpting the model and texturing it.
For this tutorial, I needed objects in the scene so that you can actually see that the spaceship is moving. With nothing other than the spaceship in the scene, you can't even tell whether the ship is moving or the camera is moving. You also get no sense of how big the ship is.
So, this tutorial is really the perfect place to introduce slightly more complex modeling techniques in blender. We are going to create asteroids to put into the scene. Asteroids are the perfect "next step" because they are more complex than the simple cubes and sphere's we generated, yet still very simple. And likewise, this is a great opportunity to introduce model texturing.
We created a .X cube model in the first tutorial, which - incidentally - is basically all a skybox is. We created a texture for that model in Paint.Net and used it to texture the walls of our room, which was the .X cube model. So, here in this tutorial, we will be using Blender to create our model rather than generating the file by hand. And we'll export it as a .fbx file rather than a .x file. I think we actually "could" export it as a .X file, but we're going to do a .fbx file instead.
Also, we are going to look at a technique known as "texturing" to paint the model we are going to create. Texturing basically just means wrapping a photograph around our model to "paint" it. We did that in the first tutorial, but not in Blender. This will be a bit more advanced. It is also more advanced than the technique of vertex painting that we used in the Matrices In Motion tutorial.
Sculpting Models in Blender
We are going to make an asteroid for our scene. It's really the perfect first model because its almost impossible to sculpt a bad one. So, it really doesn't take much sculpting talent at all. An asteroid is basically just a big lump. So almost any shape will do. This will allow us to start getting familiar with the tools and at the same time make something useful.
Start by opening up Blender and deleting the cube that it automatically generates, if you don't have it setup to stop doing that.
You may have to go through the same steps as in the Matrices In Motion tutorial where you setup the 3 button mouse and so forth. We are also going to start the same way by going to the Add==>Mesh==>UV Sphere menu and clicking it to add a UV Sphere.

When you create your UV Sphere, you are going to want to click on that hidden little plus button to expand the menu on the right side. I believe you actually click and drag on the plus.
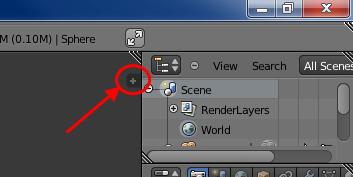
In the main viewing panel you will see this little plus sign. If you click on it you will get another menu where you control the initial setup of the sphere.
Under "Transform" you have X,Y, and Z values for "Location". Click there and set each of the 3 to zero. That will center our newly created mesh at the 0,0,0 location in this 3D scene and make the center of the model be that point.
Under "Dimensions", set the X, Y, and Z values equal to 1. This will resize it to be one unit in size. I always make a unit equal a meter and that's pretty standard in the game industry I believe. Later we can use scaling in XNA to make it larger or smaller. In fact, what we are actually going to do is make it randomly smaller or larger to create some variation in the scene.

So, at this point it doesn't look like much of an "asteroid". We want to sculpt it to make its shape a little more convincing, but how much we can distort its shape is going to be directly related to how many polygons, or triangles, are in the mesh. So, let's increase the number of polygons substantially to make it easier to smoothly deform this model.
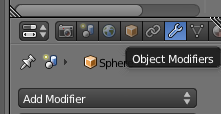
Over on the far right there is a menu where there is a little wrench. Click on that wrench to select Object Modifiers. Then click on the Add Modifier button below that.
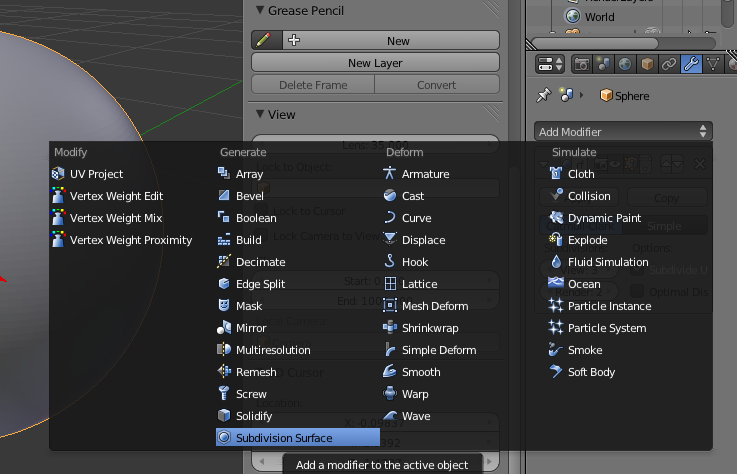
You want to select "Subdivision Surface". I'm not really an expert at using this, but you'll want to change View:1 to 2 or 3 for the purposes of this demonstration.
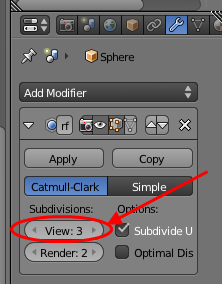
This drastically increases the number of polygons in this model. That's both good and bad. The bad is that every polygon is going to take more power from your graphics card to draw. The good is that we have a whole lot more polygons we can sculpt with here which should give us smoother results. It's always a balancing act between using as few polygons as you can to increase performance while using as many as you can to improve the look of the model. Here we're er'ing on the side of looks, but I was able to get a few thousand asteroids in this scene without taking a noticeable performance hit. Although, honestly I can't remember if I did 2 or 3 here under View when I did the asteroid that I actually used. I'm just going back over creating an asteroid after the fact to show you how I did it. So, this won't necessarily be the actual asteroid in the scene. In fact, hopefully you are going to make your own asteroid to put into the scene just to see how its done. Besides, I think you can do a better job than I did.
Now right above the View:3 button there is an "Apply" button. Click on that and that is going to make this modifier permanent in our model.
I'm going to close the plus menu that we expanded earlier to make more room on the screen and then go down to the bottom of the screen where it says "Object Mode" and change that to "Sculpt Mode".
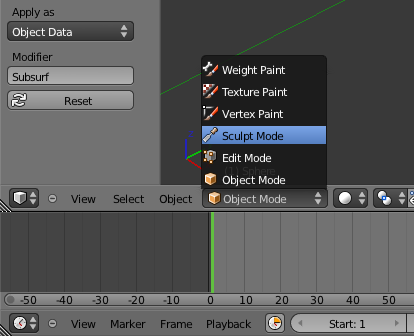
Then you are ready to start sculpting your asteroid! Go to town on it!
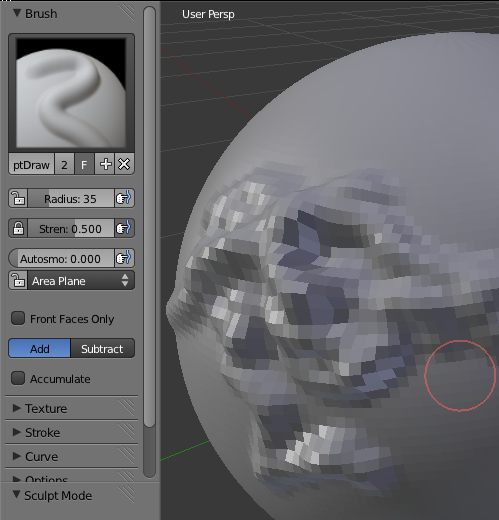
You will want to play around with the Radius and Stren settings a bit here. You may want to change them back and forth as you work so that your brush is not as obvious on the face of the model. If the brush strokes vary in size it will help them look more random.
Now don't freak out here! Don't think that you are going to have to sculpt every model that you do like this and that you are going to make everything from people to cars by sculpting this way. There are many different techniques and probably the most used in game programming is called "box modeling". Maybe we'll cover box modeling in another tutorial. But however you produce your model, all that maters is the end result. Just remember that sculpting mode is not the best way to produce a table, for example. But its perfect for an asteroid. Just warp it in any and every way you can. You just want a big uneven shaped lump, and that's not hard to sculpt at all. Basically, all you have to do is make sure no part of the surface is left smooth. I also like to go for a little more of an elongated shape for an asteroid to get away from being spherical. Although, the more spherical you keep it the easier it would be to match up to a collision sphere for collision detection. We are not worry about collision detection for this tutorial though.
Texturing and UV Unwrapping
Summary...
In Part One we look at how to texture models in Blender and bring textured models into XNA as .FBX files.